At home strength training workouts using minimal equipment: ditch the gym membership and embrace the power of your own body! This guide unveils the secrets to building serious strength without fancy equipment or a hefty price tag. We’ll explore bodyweight exercises, resistance band routines, and smart workout strategies to help you sculpt a stronger, fitter you, all from the comfort of your living room.
Get ready to transform your space into your personal fitness haven!
We’ll cover everything from crafting effective workout plans and understanding progressive overload to mastering proper form and fueling your body for optimal results. Say goodbye to excuses and hello to a stronger, healthier you, achieved with minimal fuss and maximum impact. Prepare to unleash your inner fitness warrior!
At-Home Strength Training
Forget expensive gym memberships and crowded workout spaces! At-home strength training is a fantastic way to build muscle, boost your metabolism, and improve your overall fitness, all from the comfort of your living room (or wherever your workout space happens to be!). It’s surprisingly effective and way more convenient than battling traffic or waiting for equipment. Plus, let’s be honest, your dog is a much better workout buddy than some sweaty stranger hogging the squat rack.At-home strength training with minimal equipment offers a plethora of advantages.
It’s budget-friendly, saving you a small fortune compared to gym fees. It’s incredibly flexible; you can squeeze in a workout whenever your schedule allows, no more excuses about not having enough time! Finally, it fosters a sense of personal empowerment; you’re in charge of your fitness journey, and that’s incredibly motivating.
Ditch the gym membership and embrace the glorious chaos of at-home workouts! Need a structured plan to sculpt those muscles and boost your endurance? Check out this amazing comprehensive strength training program for women to increase muscle strength and endurance for a serious strength boost. Then, get back to conquering your living room with those trusty water bottles and that surprisingly sturdy chair – your new best workout buddies!
Minimal Equipment Options
The beauty of at-home strength training lies in its simplicity. You don’t need a mountain of equipment to see significant results. In fact, some of the most effective workouts utilize nothing but your own body weight! However, adding a few inexpensive items can greatly enhance your training and target different muscle groups more effectively.
Comparison of Minimal Equipment
Here’s a table comparing some popular minimal equipment options, considering cost, effectiveness, and space requirements. Remember, effectiveness is subjective and depends on your individual goals and training program.
| Equipment | Cost | Effectiveness | Space Requirements |
|---|---|---|---|
| Bodyweight | $0 | High (for many exercises) | Minimal |
| Resistance Bands | Low ($10-$50) | High (versatile and adaptable) | Minimal |
| Dumbbells (light to moderate weight) | Moderate ($20-$100) | High (allows for varied exercises) | Low to Moderate |
| Suspension Trainer (TRX style) | Moderate to High ($50-$150) | High (full-body workouts) | Low |
Bodyweight Exercises: At Home Strength Training Workouts Using Minimal Equipment
So, you’re ready to ditch the gym membership and sculpt your physique using nothing but your own amazing body? Fantastic! Bodyweight training is incredibly versatile, challenging, and surprisingly effective. Get ready to unleash your inner superhero (or super-athlete, if capes aren’t your thing). We’ll explore a range of exercises, proper form, and sample workout routines to get you started on your bodyweight journey.
Remember, consistency is key – even small amounts of regular exercise will yield impressive results.
Ditch the gym membership and embrace the glorious power of your own living room! At-home strength training using minimal equipment is totally doable, and building serious leg and core strength is easier than you think. Check out this awesome resource for top exercises for strength training focusing on legs and core for power to unlock your inner superhero.
Then, conquer those squats and planks – your furniture will thank you (maybe).
Effective Bodyweight Exercises Targeting Different Muscle Groups
This section details a selection of bodyweight exercises, categorized by the muscle groups they primarily target. Remember to listen to your body and stop if you feel any pain.
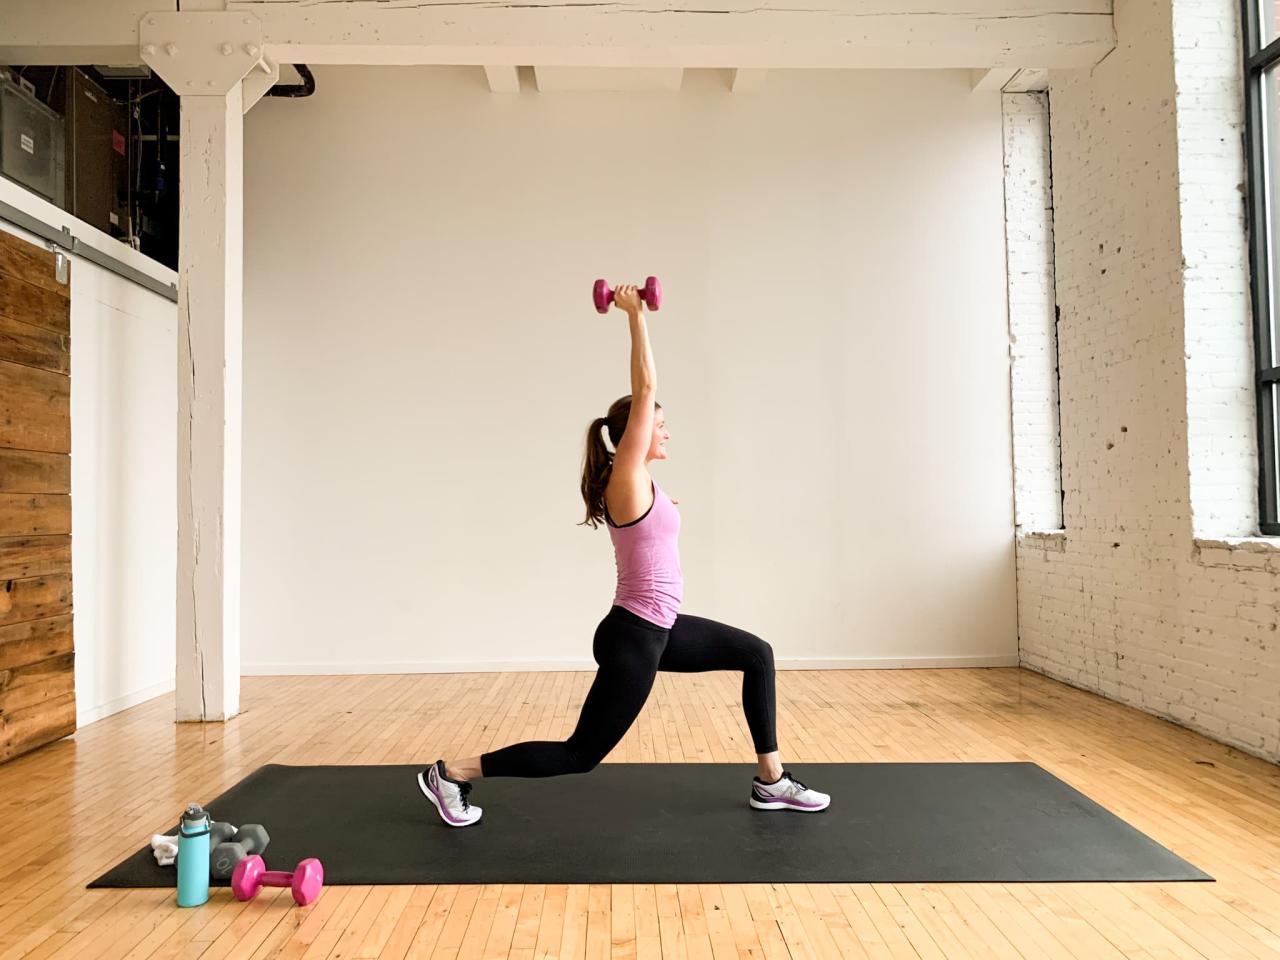
- Legs: Squats (targets quads, glutes, hamstrings), Lunges (targets quads, glutes, hamstrings), Calf Raises (targets calves), Glute Bridges (targets glutes and hamstrings).
- Chest: Push-ups (targets chest, shoulders, triceps), Incline Push-ups (targets upper chest), Decline Push-ups (targets lower chest).
- Back: Rows (using a sturdy table or chair – targets back, biceps), Supermans (targets lower back, glutes), Pull-ups (if you have a pull-up bar – targets back, biceps, shoulders).
- Shoulders: Pike Push-ups (targets shoulders), Handstand Push-ups (advanced – targets shoulders), Lateral Raises (using water bottles or other light weights – targets shoulders).
- Core: Planks (targets entire core), Crunches (targets abs), Leg Raises (targets lower abs), Russian Twists (targets obliques).
Proper Form for Bodyweight Exercises
Maintaining correct form is crucial to prevent injuries and maximize results. Poor form can negate the benefits of the exercise and potentially lead to strains or tears.
- Squats: Stand with feet shoulder-width apart, toes slightly outward. Lower your hips as if sitting in a chair, keeping your back straight and chest up. Push through your heels to return to the starting position. Imagine sitting back into a chair to maintain proper depth.
- Push-ups: Start in a plank position, hands slightly wider than shoulder-width apart. Lower your chest towards the floor, keeping your body in a straight line. Push back up to the starting position. Engage your core to maintain stability.
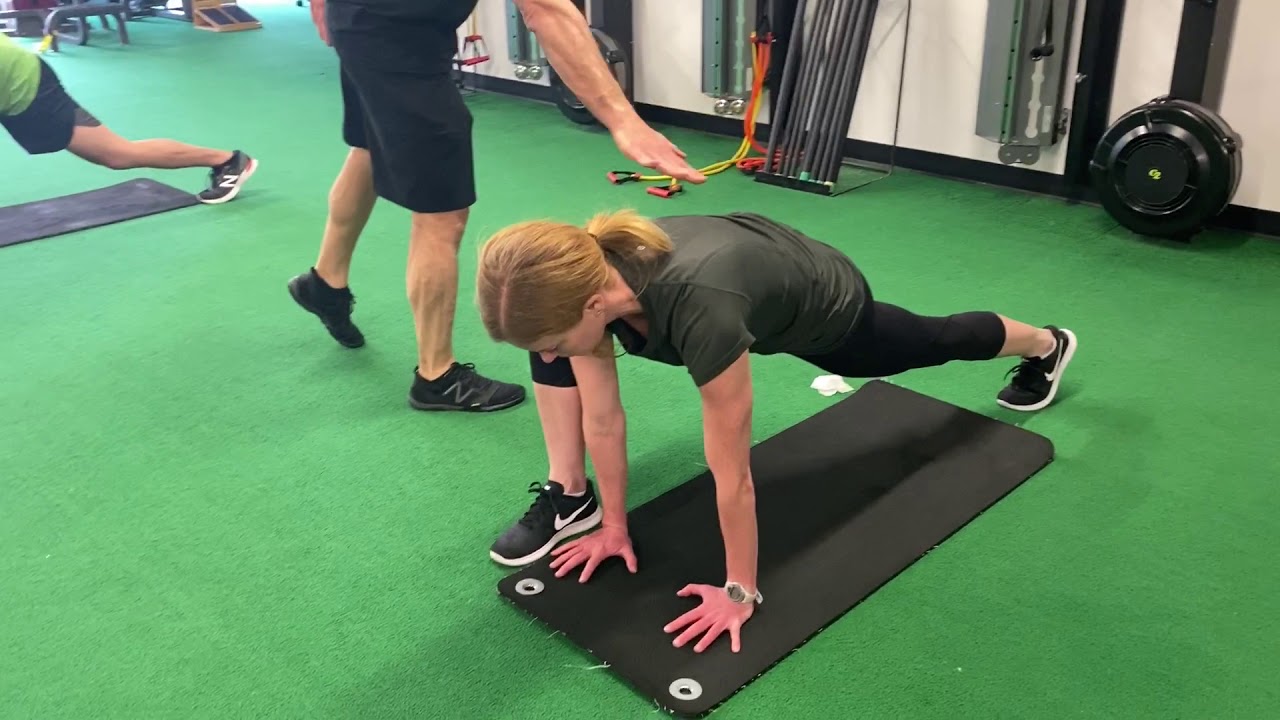
- Plank: Hold a push-up position, but with your forearms on the ground instead of your hands. Keep your body in a straight line from head to heels, engaging your core. Avoid sagging in the hips or arching your back.
Beginner Bodyweight Workout Routine
This routine is perfect for beginners and can be performed 2-3 times per week, allowing for rest days in between.
- Squats: 3 sets of 10-12 repetitions
- Push-ups (on knees if needed): 3 sets of as many repetitions as possible (AMRAP)
- Rows (using a sturdy table or chair): 3 sets of 10-12 repetitions per arm
- Plank: 3 sets, holding for 30 seconds
- Glute Bridges: 3 sets of 15-20 repetitions
Advanced Bodyweight Workout Routine
This routine incorporates variations and increased intensity, suitable for those with a solid foundation in bodyweight exercises. Perform this routine 2-3 times per week, allowing for rest days.
- Jump Squats: 3 sets of 10-12 repetitions
- Incline Push-ups: 3 sets of AMRAP
- Pull-ups (if possible, otherwise use resistance bands): 3 sets of AMRAP
- Pike Push-ups: 3 sets of AMRAP
- Plank with leg raises: 3 sets, holding for 30 seconds and performing 10 leg raises per set
- Burpees: 3 sets of 10-12 repetitions
Resistance Band Exercises
So, you’ve conquered bodyweight workouts and are ready to level up your at-home strength training game? Fantastic! Resistance bands are your new best friend – inexpensive, portable, and surprisingly versatile. They’re the unsung heroes of the fitness world, ready to transform your living room into a fully-equipped gym. Prepare to be amazed by what these colorful stretchy things can do!Resistance bands offer a fantastic way to add resistance to your workouts, making them more challenging and effective.
By varying the band’s tension and your body position, you can target different muscle groups and increase the intensity of your exercises. This makes them ideal for building strength, improving endurance, and increasing flexibility – all from the comfort of your own home.
Types of Resistance Bands and Their Uses
Resistance bands come in various strengths, typically indicated by color-coding (though this varies by brand, so always check the packaging). Lighter bands are perfect for beginners or for exercises requiring less resistance, while heavier bands provide a more intense workout for more advanced individuals. Think of it like this: a light band is like a gentle nudge, while a heavy band is a powerful push.
They also come in different materials, such as latex, fabric, and even theraband. Latex bands offer the most resistance and are great for strength training, while fabric bands might be better for rehabilitation exercises due to their gentler resistance.
Incorporating Resistance Bands into Exercises
The beauty of resistance bands lies in their adaptability. You can use them to add resistance to almost any exercise you can imagine. Simply incorporate the band into your existing routine, using it to increase the challenge. For example, you could add a band around your thighs during squats for extra glute activation or use a band around your wrists during bicep curls for a more intense burn.
The possibilities are endless, limited only by your imagination (and maybe the strength of your band!).
Resistance Band Exercises for Various Muscle Groups
Here are a few examples of how to target different muscle groups using resistance bands:
- Chest: Chest presses – Loop the band around your back, hold the ends, and push your arms outwards, mimicking a dumbbell press. Imagine you’re trying to hug a giant, very resistant teddy bear.
- Back: Band rows – Anchor the band under your feet, hold the ends, and pull the band towards your chest, squeezing your shoulder blades together. Feel that satisfying back burn!
- Shoulders: Lateral raises – Hold the band with your arms down at your sides, and raise your arms out to the sides, keeping a slight bend in your elbows. Think graceful bird wings, but with resistance.
- Biceps: Bicep curls – Stand on the band with your feet shoulder-width apart, hold the ends, and curl the band towards your shoulders. This is your chance to show off those guns (even if they’re still under construction!).
- Triceps: Overhead triceps extensions – Stand on the band, raise your arms overhead, and bend your elbows, lowering the band behind your head. It’s like giving your triceps a high five, but with resistance.
- Legs: Squats – Place the band around your thighs, just above your knees, and perform squats. Feel the extra burn in your glutes and thighs! This one’s for those who like a challenge.
Sample Intermediate Resistance Band Workout Routine
This routine is designed for an intermediate fitness level. Remember to adjust the resistance band based on your strength and comfort level. Always prioritize proper form over the number of repetitions.
Ditch the gym membership and embrace the power of the potato sack! At-home strength training workouts using minimal equipment are surprisingly effective. Want to build serious muscle? Check out these awesome muscular strength exercises to really pump up those gains. Then, get back to your living room, where your couch is your new weight bench and your imagination is the only limit to your home workout.
- Warm-up: 5 minutes of light cardio, such as jumping jacks or high knees.
- Chest Press: 3 sets of 12-15 repetitions
- Band Rows: 3 sets of 12-15 repetitions
- Lateral Raises: 3 sets of 15-20 repetitions
- Bicep Curls: 3 sets of 12-15 repetitions
- Overhead Triceps Extensions: 3 sets of 12-15 repetitions
- Squats with Resistance Band: 3 sets of 15-20 repetitions
- Cool-down: 5 minutes of stretching.
Workout Structure and Progression
So, you’ve conquered the world of bodyweight squats and resistance band bicep curls. Fantastic! But a haphazard approach to your home workouts is like trying to bake a cake without a recipe – you might getsomething* edible, but it probably won’t be a masterpiece. To truly sculpt your superhero physique (or just feel fantastically fit), you need a structured approach to your training.
That’s where workout structure and progression come in. Think of it as the secret sauce to your fitness journey.
Ditch the gym membership and embrace the glorious, sweat-inducing power of at-home strength training! With minimal equipment, you can sculpt a physique worthy of a Greek god (or goddess!). To really maximize your gains, check out the best strength training program for personalized plans. Then, get back to those killer at-home workouts – your couch will thank you (maybe).
Warm-up and Cool-down Routines
A proper warm-up prepares your body for the workout ahead, reducing the risk of injury and improving performance. Think of it as gently waking up your muscles, increasing blood flow, and lubricating your joints. A good warm-up might include five minutes of light cardio, such as jumping jacks or high knees, followed by dynamic stretches like arm circles and leg swings.
Conversely, a cool-down helps your body gradually return to its resting state, reducing muscle soreness and promoting recovery. This typically involves five to ten minutes of light cardio and static stretches, holding each stretch for 20-30 seconds. Ignoring these crucial steps is like starting a race without stretching – you might finish, but you’ll likely be feeling the pain later.
Progressive Overload in Strength Training
Progressive overload is the cornerstone of strength training. It simply means gradually increasing the demands placed on your muscles over time. This could involve increasing the weight, repetitions, sets, or the difficulty of the exercise itself. For example, if you can easily do 10 push-ups, you might progress to 12 push-ups next week, then 15 the week after, or try incline push-ups which are harder.
Without progressive overload, your body adapts to the training stimulus and plateaus, hindering further progress. It’s the principle of constantly challenging your muscles to grow stronger and more resilient. Think of it as a constant game of “one-upmanship” with your own body.
Tracking Progress and Adjusting Workout Intensity
Tracking your progress is vital for staying motivated and ensuring your workouts remain effective. You can use a simple notebook, a spreadsheet, or a fitness app to record the exercises you perform, the number of sets and reps, and the weight used (or resistance level for bands). Regularly reviewing your progress allows you to identify areas where you’re excelling and areas where you need to push harder.
If you’re not seeing improvement after several weeks, it’s time to adjust your workout intensity by increasing the weight, reps, sets, or exercise difficulty. Remember, consistency is key, but smart adjustments are crucial for continuous improvement. Imagine trying to learn a musical instrument without checking your progress – you’d never know if you’re improving or not!
Sample 4-Week Workout Plan
This plan incorporates progressive overload. Remember to adjust the weights or resistance bands to suit your fitness level. Always prioritize proper form over the number of reps.
| Week | Monday | Wednesday | Friday |
|---|---|---|---|
| 1 | Squats: 3 sets of 10 reps Push-ups: 3 sets of as many reps as possible (AMRAP) Rows (using resistance band): 3 sets of 12 reps |
Lunges: 3 sets of 10 reps per leg Plank: 3 sets, hold for 30 seconds Bicep curls (resistance band): 3 sets of 15 reps |
Squats: 3 sets of 12 reps Push-ups: 3 sets of AMRAP Rows (resistance band): 3 sets of 15 reps |
| 2 | Squats: 3 sets of 12 reps Push-ups: 3 sets of AMRAP Rows (resistance band): 3 sets of 15 reps |
Lunges: 3 sets of 12 reps per leg Plank: 3 sets, hold for 45 seconds Bicep curls (resistance band): 3 sets of 15 reps |
Squats: 3 sets of 15 reps Incline Push-ups: 3 sets of AMRAP Rows (resistance band): 3 sets of 15 reps, increase resistance |
| 3 | Squats: 3 sets of 15 reps Incline Push-ups: 3 sets of AMRAP Rows (resistance band): 3 sets of 15 reps, increase resistance |
Lunges: 3 sets of 15 reps per leg Plank: 3 sets, hold for 60 seconds Bicep curls (resistance band): 3 sets of 20 reps |
Squats: 3 sets of 15 reps, add weight if possible Push-ups: 3 sets of AMRAP Rows (resistance band): 3 sets of 20 reps, increase resistance |
| 4 | Squats: 3 sets of 15 reps, add weight if possible Push-ups: 3 sets of AMRAP Rows (resistance band): 3 sets of 20 reps, increase resistance |
Lunges: 3 sets of 15 reps per leg, add weight if possible Plank: 3 sets, hold for 60 seconds Bicep curls (resistance band): 3 sets of 20 reps, increase resistance |
Squats: 3 sets of AMRAP Push-ups: 3 sets of AMRAP Rows (resistance band): 3 sets of AMRAP, increase resistance |
Nutrition and Recovery

So, you’ve been diligently following your at-home strength training program, feeling the burn (in a good way, hopefully!), and noticing those muscles starting to pop. Fantastic! But guess what? Your gains aren’t just built in the gym; they’re fueled and repaired in the kitchen and during your downtime. Nutrition and recovery are the unsung heroes of your fitness journey – the secret sauce to transforming your body into a lean, mean, strength-training machine.Building muscle and recovering from workouts requires a strategic approach to nutrition.
Think of it like this: you’re tearing down muscle fibers during your workouts, and your body needs the right building blocks to rebuild them bigger and stronger. Neglecting this crucial aspect is like trying to build a house with only half the bricks – it’s not going to stand the test of time.
Macronutrient Balance for Strength Training
A balanced diet supporting strength training revolves around getting enough of the right macronutrients: protein, carbohydrates, and fats. Protein is the star player, providing the amino acids necessary for muscle protein synthesis (that’s the fancy term for muscle growth). Aim for around 1.6-2.2 grams of protein per kilogram of body weight daily. Carbohydrates are your body’s primary energy source, crucial for fueling intense workouts and replenishing glycogen stores (your muscles’ energy reserves).
Don’t shy away from healthy carbs like whole grains, fruits, and vegetables. Finally, healthy fats are essential for hormone production, cell function, and overall health. Include sources like avocados, nuts, and olive oil in your diet. A sample daily intake might look like this: Breakfast: Oatmeal with berries and nuts (carbs, protein, fats); Lunch: Chicken salad sandwich on whole-wheat bread (protein, carbs); Dinner: Salmon with roasted vegetables (protein, healthy fats, carbs).
The Importance of Sleep and Rest
Sleep isn’t just for the lazy; it’s when your body does its magic. During sleep, your body releases growth hormone, crucial for muscle repair and growth. Aim for 7-9 hours of quality sleep per night. Ignoring sleep is like ignoring your body’s repair crew – your muscles won’t recover effectively, leading to plateaus and even injury. Consider establishing a consistent sleep schedule and creating a relaxing bedtime routine to improve your sleep quality.
Managing Muscle Soreness (DOMS)
That delightful post-workout ache, known as Delayed Onset Muscle Soreness (DOMS), is a sign that your muscles are adapting and growing. However, excessive soreness can hinder your progress. Strategies to manage DOMS include active recovery (light cardio, gentle stretching), proper hydration (water is your friend!), and potentially using foam rolling or massage to ease muscle tension. Remember, listening to your body is key.
Don’t push yourself too hard when recovering from a tough workout. Rest and recovery are just as important as the workout itself. Consider incorporating rest days into your training schedule to allow your muscles adequate time to repair.
Safety and Considerations
So, you’ve decided to ditch the gym membership and embrace the glorious world of at-home strength training. Fantastic! But before you start hoisting furniture like a weightlifting Hercules (please don’t actually do that), let’s talk safety. Because while building a bodacious physique is the goal, avoiding a trip to the emergency room is even more important. Think of safety as the unsung hero of your fitness journey – it’s the silent guardian, the watchful protector, the… well, you get the idea.Proper form and technique are paramount in preventing injuries.
Think of your body as a finely tuned machine; if you use it incorrectly, you’ll quickly find yourself with some very expensive and painful repairs. Ignoring proper form is like trying to build a house with wonky bricks – it might look okay at first, but it’s going to crumble spectacularly eventually. This section will delve into common mistakes, potential hazards, and strategies to build a safe and effective workout space.
Common Mistakes to Avoid During At-Home Strength Training
Ignoring proper form is the most common pitfall. Rushing through exercises to finish faster, using excessive weight beyond your capabilities, and neglecting warm-up and cool-down routines are also frequent errors. For example, performing squats with rounded backs can lead to lower back pain, while improperly executing push-ups can strain your shoulders or wrists. Similarly, neglecting to warm up your muscles before intense exercise is like trying to start a car in winter without letting it warm up first – it’s not going to go smoothly.
The Importance of Proper Form and Technique
Maintaining correct posture and form is crucial for maximizing the effectiveness of each exercise and minimizing the risk of injury. Imagine trying to lift a heavy box with your back bent – it’s much harder and far more likely to result in injury than if you lift with your legs and maintain a straight back. Focusing on controlled movements, maintaining a stable core, and paying attention to the specific muscle groups being worked are all key elements of proper form.
Many online resources offer video demonstrations of proper exercise techniques; utilizing these is highly recommended.
Ditch the gym membership and embrace the glorious chaos of at-home workouts! With just your bodyweight and maybe a chair, you can build serious strength. Want to level up your home-gym game and sculpt a physique worthy of a Greek god? Then check out this killer ultimate strength training session plan for building overall body strength for a truly epic transformation.
After that, you’ll be back to conquering your living room like a fitness ninja!
Potential Risks and Injuries Associated with Strength Training
Strength training, while beneficial, carries inherent risks. Muscle strains, sprains, and tendonitis are common injuries that can occur from improper form, excessive weight, or insufficient rest. More serious injuries, such as fractures, are possible, though less frequent. Overtraining, characterized by persistent muscle soreness, fatigue, and decreased performance, is another potential risk. Remember, consistency and patience are key – pushing yourself too hard too fast is a recipe for disaster.
Tips for Creating a Safe and Effective Home Workout Environment
Creating a safe workout space involves several key steps. Ensure you have enough space to move freely without bumping into furniture or other obstacles. A clean, clutter-free area is essential. Use a workout mat to provide cushioning and improve grip. Good lighting is also crucial for maintaining proper form and preventing falls.
Consider investing in a mirror to help monitor your form. Finally, inform someone of your workout routine, particularly if you are working out alone.
Visual Aids (Illustrative Descriptions)
Let’s ditch the fancy pictures and get down to the nitty-gritty of proper form. Visualizing these exercises correctly is half the battle – and prevents embarrassing wobbles and potential injuries. Remember, proper form is key to maximizing results and minimizing risks. So, let’s paint a picture with words, shall we?
Proper Squat Form
Imagine yourself standing with feet shoulder-width apart, toes slightly pointed outwards. Your back should be straight, core engaged (think about bracing your abs like you’re about to get punched!), and your chest lifted. Now, begin to lower yourself down as if you’re sitting in an invisible chair. Keep your weight in your heels, and ensure your knees track over your toes – avoid letting them cave inwards.
The depth of your squat should ideally be until your thighs are parallel to the ground, but listen to your body; don’t force it! As you lower, imagine your glutes (buttocks) and quads (thigh muscles) working together like a well-oiled machine. To return to standing, push through your heels and engage your glutes to drive yourself back up to the starting position.
Maintain that proud posture throughout the entire movement.
Proper Push-Up Form, At home strength training workouts using minimal equipment
Start by positioning your hands slightly wider than shoulder-width apart, directly beneath your shoulders. Your body should form a straight line from head to heels, engaging your core to maintain stability. Imagine a plank – that’s the position you want to be in. Now, slowly lower your chest towards the floor, bending your elbows at about a 45-degree angle.
Keep your elbows slightly tucked in, not flared out to the sides. Your body should remain rigid, avoiding any sagging in the hips or arching in the back. Once your chest nearly touches the floor, push back up to the starting position, extending your arms fully but avoiding locking your elbows. Feel the burn in your chest, shoulders, and triceps!
Proper Plank Form
Begin by positioning yourself face down on the floor, supporting your weight on your forearms and toes. Your forearms should be parallel to each other, elbows directly beneath your shoulders. Engage your core muscles powerfully – imagine someone is about to tickle you, and you’re bracing yourself against it! Your body should form a perfectly straight line from head to heels, avoiding any sagging in the hips or arching in the back.
Hold this position, maintaining the tension in your core and glutes, for as long as you can comfortably maintain proper form. Remember, quality over quantity – a shorter, perfectly executed plank is far more beneficial than a longer, sloppy one.
Concluding Remarks
So, there you have it – your comprehensive guide to conquering at-home strength training with minimal equipment! Remember, consistency is key, and even small steps forward contribute to significant long-term gains. Don’t be afraid to experiment, find what works best for your body, and most importantly, enjoy the journey of becoming stronger and healthier, one rep at a time.
Now go forth and conquer your fitness goals – your body (and your wallet) will thank you!